Lecture 4 - UIKit
In the previous two lectures, we learned about the main components that make up Interface Builder: Autolayout and Storyboards. These tools were created very recently in iOS development to help speed up and help visualize the process of creating a UI for your app. Before these tools came about, however, developers had to build their apps from scratch.
And so, this is what we're going to discuss today--the teeny tiny building blocks that make up our user interface and how it works. Most iOS developers fall into two camps: those who like storyboards, and those who absolutely hate them. While Storyboards provide simplicity and speed, they also bring a massive lack of control--they almost feel like a black box to the user. For developers, this can be a scary thought: the entirety of your app's visuals are determined by this black box simplification.
Programming your UIs from scratch, however, gives you total control of the situation. You know exactly where and why an object will appear on your screen, as long as you write the code correctly. You do give up simplicity, and it might take a good bit more time to make your UIs, but many developers would say it's worth it to not have to deal with the black box that is Interface Builder.
Hipstr
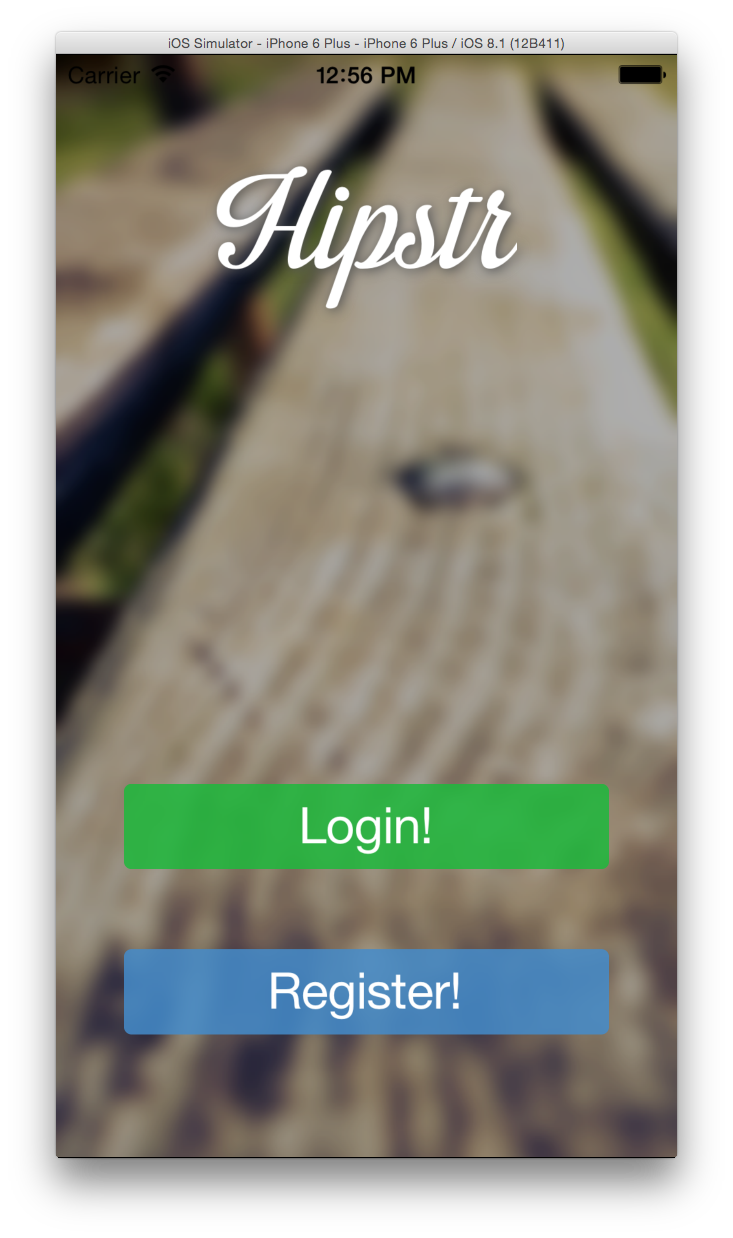
The app we'll be making today is a very basic one. It's called Hipstr, and it doesn't do anything. It just looks nice:

You can download the finished app here, as well as an annotated Playground on how we built it. As such, this lecture page won't contain the how-to on the Hipstr app--that's what going to class is for (as well as the annotated Playground). So, we're just going to talk about broad topics here.
Hipstr Handout
Download the Hipstr handout here.
Pros and Cons of Programmatic UIs
Check out the Lecture 3 webpage for a brief history of interface building under the Apple platform.
Thus far in this class, you have built apps using Interface Builder. This is the nice, clean, drag-and-drop interface you've been using to create your UIs. Drag-and-drop is great if you're making very simple apps, but it tends to leave a bit to be desired. First and foremost, you don't have total control over how your UI is designed.
Most of the time while using Interface Builder in conjunction with Size Class and Autolayout, you'll find yourself wondering why a certain view isn't displaying exactly where you want it. Or, you might be wondering why Autolayout doesn't permit you to use percentage-based constraints (e.g. I want this label to be 30% down from the top of the screen). Interface Builder is the way that it is because the designers wanted to abstractify the process of building UIs.
As a result of this abstraction, we have the nice, drag-and-drop interface that you're so familar with. But as a consequence, Xcode has to make some assumptions about where you want your views to be displayed, since iOS apps come in many different shapes and sizes. Autolayout is a step in the right direction, but ultimately you end up at the mercy of complicated constraints. Not fun.
But Interface Builder is an abstraction. Over what? Pure programmatic UI design. Back before Intreface Builder was a thing, developers had to create UIs with code. While this was a tedious, boring, time-consuming trial-and-error approach to designing UIs, it left no ambiguity in how your screen would look.
So, you have some pros in writing your UIs through code. You have total control over how your UI looks on any screen or orientation. There's nothing hidden from you (unlike in Autolayout, where you truly have no idea what interesting place your view will be placed if you're missing a constraint). In addition, it forces to learn the internals of UIKit, which is instrumental in knowing how to make optimized and high-quality apps.
The cons though are that you're going to spend much, much longer creating the UI through code. Instead of having a concrete idea of what your app will look like at runtime, you'll have to compile your code each and every time you make a tiny tweak to your UI code. It's a more boring approach to UI design, also.
In general, we (the course staff) prefer to do UIs programmatically because we think the pros (control) outweight the cons (tediousness). Beginning app developers tend to prefer Storyboards for now and shift towards programmatic UIs towards the end of the semester.
Empty Applications in Xcode
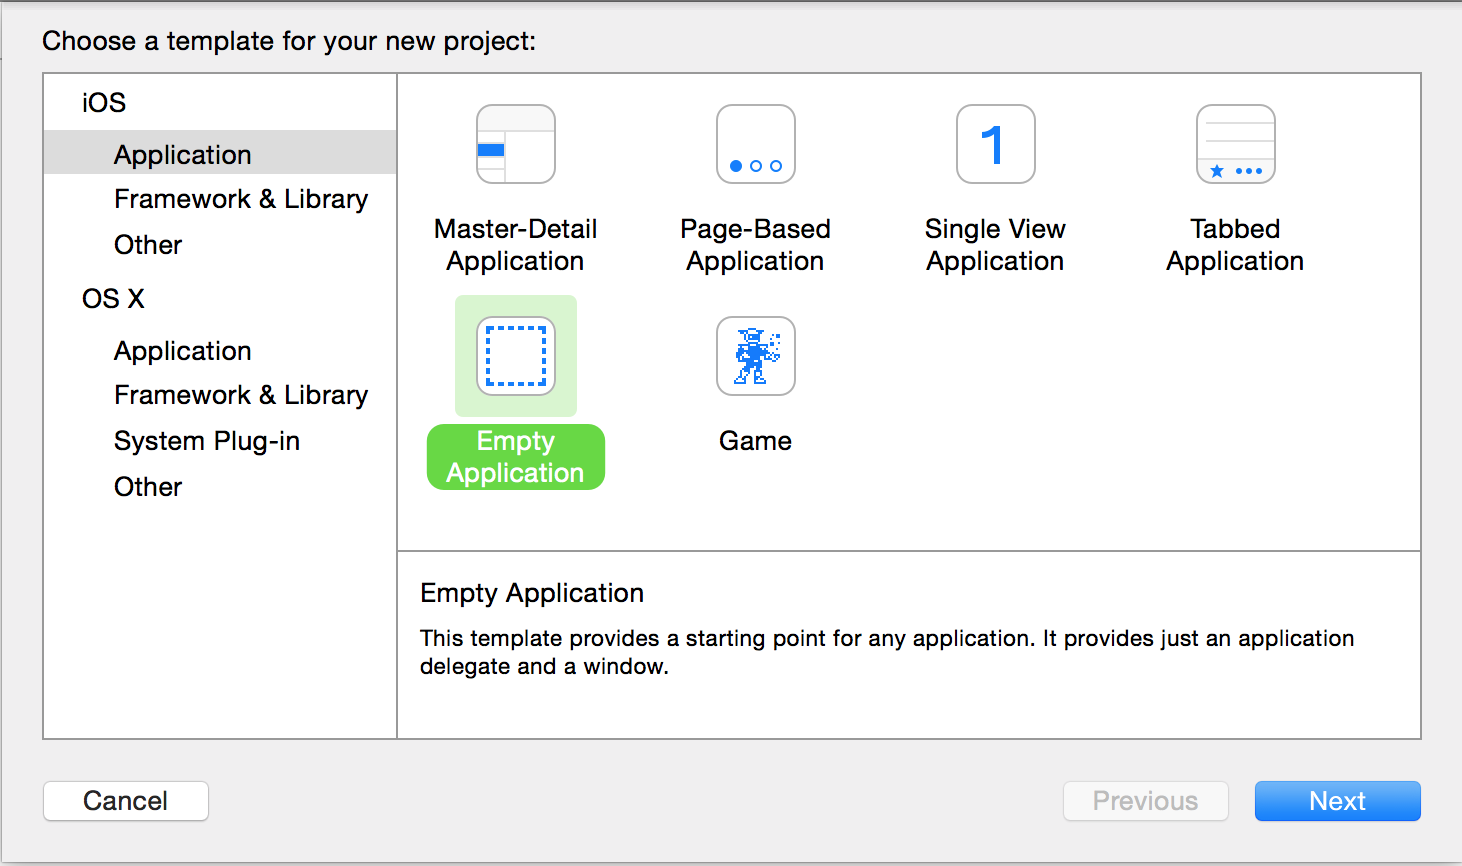
Previously, you used to be able to make an Empty Application in Xcode. This application template would provide you with AppDelegate and other high-level application-related bits and pieces, but nothing about Storyboards or UIs. When Xcode 6 came around, Apple felt like forcing Storyboard's on us, and so they removed the option to make an Empty Application. Instead, you can either make an app with a Storyboard, or you can make an app with nothing in it at all (not even AppDelegate, so the app wouldn't even compile).
This is an issue for developers that are used to creating apps with programmatic UIs. We relied on those app templates. Now, we must make them ourselves. There's an easy way and a hard way to do this.
The Easy Way
Download the Empty Application template. Unzip it, and copy it into the directory:
/Applications/Xcode.app/Contents/Developer/Platforms/iPhoneOS.platform/Developer/Library/Xcode/Templates/Project Templates/iOS/Application/
You're done. You can now access the Empty Application template here:

The Hard Way
We briefly covered this in lecture. So, the step-by-step is in the annotated Playground on how we built Hipstr. It is somewhat less fun than the above approach.
UIViews
UIView is one of the most important classes in all of iOS development. Your users will very likely be interacting with a large hierarchy of views. We have talked a bit about views before, but now we really want to dive into the specifics.
So, what is a view? Well:
- - A view is an instance of UIView or a subclass of UIView
- - A view knows how to draw itself on the application's window, an instance of UIWindow
- - A view exists within a hierarchy of views. The root of this hierarchy is the application's window
- - A view handles events, like touches
A few examples of UIView subclasses are UILabel and UIButton which you are all familiar with from Interface Builder. Each one of these views know how to draw themselves to their superview. For example, the buttons we have been using draw an internal label and know how to handle tap events. The super-most view is the application's window, which is an instance of UIWindow which is a subclass of UIView.
There are three main structs you should know about when dealing with views, CGPoint, CGSize, and CGRect. CG stands for CoreGraphics, the main graphics library used in iOS applications.
// A CGFloat is just a fancy name for a Double (or, if you're running on
//  32-bit hardware, a Float).

struct CGPoint {
    var x: CGFloat
    var y: CGFloat
}

struct CGSize {
    var width: CGFloat
    var height: CGFloat
}

struct CGRect {
    var origin: CGPoint
    var size: CGSize
}
Structs are actually a type which allows us to put multiple values into a single object-like structure (thus, struct) to make it easier to pass around. If you've programmed in C before, you very likely have seen this.
Every UIView has two rectangles that define it's position on the screen, a frame and it's bounds. This is frequently one of the most confusing parts of iOS development, so we will do our best to explain it well.
Frames and Bounds
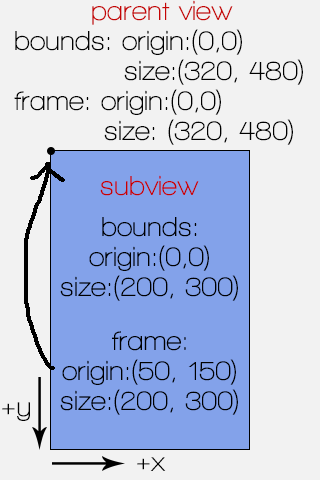
First, let's talk about CGRect. This is just a simple definition of a geometric rectangle. It contains two main pieces: the origin, and the size. The origin of a CGRect points to the top-left corner of the view. The size is a width and height which extends down and to the right from the origin. The image below shows how how the origin relates to the width and height of the view.
A view's bounds is a rectangle relative to itself. If the view is not translated (which by default, it is not), a view's bounds rectangle will always have an origin of (0,0). This is because relative to itself, the top left corner of any view is always the zero point. The size will just be the view's full width and height.
A view's frame is a rectangle relative to that view's superview. A view's frame will have an origin corresponding to the offset of that view's top-left corner from it's superview's top-left corner. In the picture below, the blue subview is at location (50, 150) in the light gray view. This means that it's frame has an origin at that point. The frame's width and height is the same as it is for the bounds.
If a view fills the entire window, that view's frame and bounds will be the same. Remember that the super-most view is the application's window which fills the full available screen.

Notice how views live in a hierarchy. Every view can have a collection of subviews, which can also have their own subviews, etc. As your applications become more and more complicated with many levels of this hierarchy, remembering the difference between frame and bounds will be crucial to ensuring your views are arranged properly.
Adding Fonts
For some reason, Apple doesn't like you using fonts that aren't natively provided by the iPhone. So, if you want to add a new font, you need to follow the steps provided here.
Note that the two code blocks in the above link are for Objective-C. Here is the appropriate Swift translation for the first code block:
for family in UIFont.familyNames() {
    println("\(family)")
    for name in UIFont.fontNamesForFamilyName(family as String) {
        println("\t\(name)")
    }
}
And the second code block:
let label: UILabel = UILabel(frame: CGRectMake(
    0, 0, self.view.frame.size.width, 60))
label.textAlignment = NSTextAlignment.Center
label.text = "Using Custom Fonts"
label.font = UIFont(name: "Neutraface2Display-Titling", size: 20)